Engineering | Knowledge | Technology

How can we design a cantilever slab?


A Cantilever slab is a structure that is fixedly supported at one side

Note: Careful while detailing your reinforcement

1- You know the dimension of your slab ( Thickness, Width, and length ). then Go for Load Analysis to get the maximum design load combined in KN/m or

2- Next go for structural Analysis to get your maximum forces (i.e maximum shear and moment )

3- Then calculate the minimum area of reinforcement required. Also, calculate the minimum area of reinforcement and compare the two.

4- Detailed your reinforcement arrangement. ( provide more at the area of the maximum bending moment )

5- Check for shear. if shear reinforcement needs to be provided or not.

6- check for deflection.

However, An easy way is to use design software such as Staad, ETABS….. and so on. using the software can give you everything within 15 minutes.


Is there a way to connect a new reinforced concrete slab


Is there a way to connect a new reinforced concrete slab on an existing reinforced concrete beam, given that the beam doesn't have steel dowels to connect with?

Yes its possible, but I agree with Greville Wood’s answer and genuinely don’t think he is touting for work.

Depends on the loads involved and connecting to the existing set concrete needs specific techniques and materials. Plus you won’t know the reinforcement on the existing beam. It’s a recipe for an expensive mistake.

The safest way is to break back the concrete to establish what reinforcement exists, that way you can physically reconnect to the existing concrete providing it hasn’t degraded or spalled.

The existing concrete will have to be primed and the new concrete replaced, not always easy. The new concrete may have to be polymer modified. That why it is best to check with an engineer.

Design of highway bridges based on AASHTO-LRFD


Design of highway bridges based on AASHTO-LRFD

Introduction to bridge engineering

- Wooden bridge

- Metal truss bridge

- Suspension bridge

- Metal arch bridge

- Reinforce concrete bridge

- Girder bridge

Bridge specification and design standard


All software and resources in the SONATUTS directory are the property of their respective authors. All downloadable or viewable content available on SONATUTS is provided as-is. You agree that you bear sole responsibility for your own decisions to download or use any of the software listed.

What is a rebar coupler?


What is a rebar coupler?

Rebar couplers are used in reinforced concrete structures to the connection steel bars that replace a normal rebar lap joints. The rebar couplers are very useful for reinforced concrete structure columns and walls. The rebar coupler comprises a piece of rebar furnished with a string, and a coupler sleeve at the correct end as seen toward an establishment. In development joints, rebar couplers can be utilized to supplant all bits of the rebar experiencing the form work. Rebar couplers are utilized for joining rebars with a full tensions capacity. The closures of bars to be joined are furnished with strings, and the bars are joined utilizing a coupler sleeve that moves the power on the rebar across the association.

Type of rebar coupler


Design of Reinforced Concrete Khmer Language (ETC)


Teaching Reinforced Concrete Design With Mathcad Application. The design of various components of a building structure is performed based on the 

- American Concrete. Institute (ACI) Building Code 318

- AASHTO – The American Association of State Highway and Transportation Officials

- American Society of Civil Engineers (ASCE 7)

- International Building Code (IBC)

Introduces the fundamentals of reinforced concrete design in a clear and comprehensive manner and grounded in the basic principles of mechanics of solids

This book prepared by Engineering and Technology Center (ETC)

If you want to buy Original book for support author

Please contact ETC for more information


What is Lap Length?


What is the lap length?

It is the length provided to overlap two rebars in order to safely transfer load from one bar to another bar and alternative to this is, to provide mechanical couplers. 

What are the general rules for lap length?

For the different diameter of bars

When the bars of different diameters are to be spliced the lap length is calculated considering the smaller diameter bars.

Suppose you are constructing a column, from bottom 20 mm diameter bar is coming and from here 16 mm diameter bar has to be spliced then for calculating lap length 16 mm diameter should be considered and not 20 mm.

What is the minimum lap length?

For direct tension, the straight length of the lapping bar shall not be less than 15d or 20 cm. While in the case of compression lapping should not be less than 24d.

What is the difference between lap length and development length?

Lap length is provided to safely transfer stresses from one bar to another, while development is needed to safely transfer the stresses from steel bar to concrete to make a continuous structure.

Where lap length is provided in column?

The bending moment at the middle portion of the column is zero it means the middle portion of the column is least stressed. Hence, lapping should be provided in the mid-section of the column.


Standard test on fresh concrete


Standard test on fresh concrete
  •  Slump Test
  •  Flow Test
  • Compacting Factor Test
  • Ve Be Time Test
  • L-Box Test
  •  J-Ring Test
  • V-Funnel Test
  • Orimet Test


All software and resources in the SONATUTS directory are property of their respective authors. All downloadable or viewable content available on SONATUTS is provided as-is. You agree that you bear sole responsibility for your own decisions to download or use any of the software listed.


One Way Slab Design Spreadsheets to Eurocode 2


Slab consists of two types which are one way slab and two way slabs.

One way slab has two types namely simply supported slab and one way continuous slab. While two way slabs also consist of two types namely simply supported two way slab and constrained slab. Slab types can be decided through side ratio calculation through BS8 110 reference such as:

  • Ly / Lx <2.0 (two way)
  • Ly / Lx > 2.0 (one-way)
with Ly was longer side and Lx was shorter side.
A slab is called one-way if the main reinforcement designs within one direction only. 
This situation happens if slab is supported only on two sides only. If slab were supported at all four sides, slab will become one way if long span ratio (Ly) to short span (Lx) is exceeding 2. Because of slab string one-way then reinforcement in span direction is main reinforcement, while reinforcement in direction perpendicular by span known as second reinforcement which functions as binding main reinforcement and help stress distribution because of temperature changes and concrete shrinkage.


Download Excel Spreadsheets


All software and resources in the SONATUTS directory are property of their respective authors. All downloadable or viewable content available on SONATUTS is provided as-is. You agree that you bear sole responsibility for your own decisions to download or use any of the software listed.


Overhead Steel Crane Support Details


An overhead crane, commonly called a bridge crane, is a type of crane found in industrial environments. An overhead crane consists of parallel runways with a traveling bridge spanning the gap. A hoist, the lifting component of a crane, travels along the bridge. If the bridge is rigidly supported on two or more legs running on a fixed rail at ground level, the crane is called a gantry crane (USA, ASME B30 series) or a goliath crane (UK, BS 466).

Unlike mobile or construction cranes, overhead cranes are typically used for either manufacturing or maintenance applications, where efficiency or downtime are critical factors.

All software and resources in the SONATUTS directory are property of their respective authors. All downloadable or viewable content available on SONATUTS is provided as-is. You agree that you bear sole responsibility for your own decisions to download or use any of the software listed.


Stair Reinforcement Details


Reinforced Concrete Stairs Cross Section Reinforcement Detail This is a typical Reinforced Concrete Stairs Cross Section Reinforcement Detail, in CAD drawing that needs to be included alongside with every structural drawing that includes a concrete staircase to show correct reinforcement placement at the start, middle and landing part of the stairs. Purchased product contains : .dwg file .dxf file .pdf file fully customisable A MUST HAVE DETAIL One of the most useful structural details when designing for reinforced concrete. This CAD dwg drawing for an RC staircase reinforcement detail will come handy and save you time almost in all projects. Essential typical structural detail for most staircase designs. DETAILED CAD DRAWING main top & bottom reinforcement transverse reinforcement middle landing support detailing non-reinforced tread step foundation starters reinforcement.


All software and resources in the SONATUTS directory are property of their respective authors. All downloadable or viewable content available on SONATUTS is provided as-is. You agree that you bear sole responsibility for your own decisions to download or use any of the software listed.


What Is Singly Beam & Doubly Beam


What Is Singly Beam?

A singly beam is the beam which is provided with longitudinal reinforcement in the tension zone. Compressive forces are handled by the concrete section in the beam.


What Is Doubly Beam?

The beams reinforced with steel in compression and tension zones are known as doubly reinforced beams. This kind of beam will be found essential when headroom consideration or architectural concern the depth of the beam is restricted.


The beam with its restricted depth, if reinforced provided on the tension side only, it may not have sufficient moment of resistance to resist the bending moment.

By raising the quantity of steel in the tension zone, the moment of resistance cannot be increased indefinitely. Generally, the moment of resistance can be increased by not more than 25% beyond the balance moment of resistance by making the beam reinforced on the tension face.

Hence, to additional increase, the moment of resistance of a beam section of unlimited dimensions, a doubly reinforced beam is provided.

Guide to Design of RCC Columns


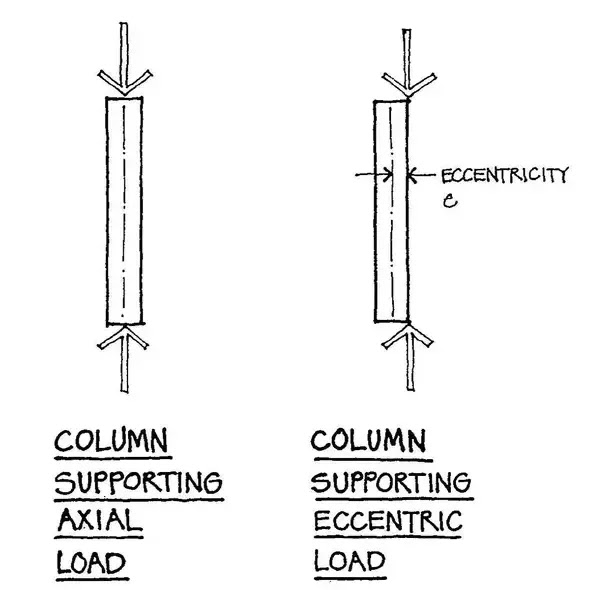
The columns in a structure carry the loads from the beams and slabs down to the foundations, and therefore they are primarily compression members, although they may also have to resist bending forces due to the continuity of the structure. The analysis of a section subjected to an axial load plus bending is dealt with in chapter 4, where it is noted that a direct solution of the equations which determine the areas of reinforcement can be very laborious and impractical. Therefore, design charts or some form of electronic computer are often employed to facilitate the routine design of column sections.


A column is a very important component in a structure. It is like the legs on which a structure stands. It is designed to resist axial and lateral forces and transfer them safely to the footings in the ground.

Columns support floors in a structure. Slabs and beams transfer the stresses to the columns. So, it is important to design strong columns.

A column is defined as a compression member, the effective length of which exceeds three times the least lateral dimension. Compression members whose lengths do not exceed three times the least lateral dimension, may be made of plain concrete.

A column may be classified based on different criteria such as:

1. Based on shape

- Rectangle

- Square

- Circular

- Polygon


2. Based on slenderness ratio

The ratio of the effective length of a column to the least radius of gyration of its cross section is called the slenderness ratio.

- Short RCC column, =< 10

- Long RCC column, > 10

- Short Steel column, =<50

- Intermediate Steel column >50 & <200

- Long Steel column >200


3. Based on type of loading


- Axially loaded column

- A column subjected to axial load and unaxial bending

- A column subjected to axial load and biaxial bending

4. Based on pattern of lateral reinforcement


- Tied RCC columns

- Spiral RCC columns

Basic Civil Engineering


As we all know that civil engineering can’t be isolated from other engineering fields. For the betterment of human life civil engineering require electrical engineering, architectural engineering. Hence all important aspects of civil engineering are taught as elements of civil engineering in all over the world.

This particular book with title “Basic Civil Engineering” covers all the basic definitions, terminologies and everything related to civil engineering. The book is written in very simple English and is very handy for students to learn civil engineering.


Contents

UNIT - I: CIVIL ENGINEERING MATERIALS 1–70

1 TRADITIONAL MATERIALS 3–32

2 MORTARS 33–38

3 CONCRETE 39–54

4 METALS AS BUILDING MATERIALS 55–58

5 MISCELLANEOUS BUILDING MATERIALS 59–69

UNIT - II: BUILDING CONSTRUCTION 71–136

6 BUILDING PLANNING 73–81

7 FOUNDATIONS 82–91

8 SUPER STRUCTURES 92–127

9 DAMPNESS AND ITS PREVENTION 128–132

10 COST EFFECTIVE CONSTRUCTION TECHNIQUES 133–135

UNIT - III: SURVEYING 137–236

11 INTRODUCTION TO SURVEYING 139–148

12 LINEAR MEASUREMENTS AND CHAIN SURVEYING 149–175

13 COMPASS SURVEYING 176–194

14 PLANE TABLE SURVEYING 195–208

15 LEVEL AND LEVELLING 209–225

16 MODERN TOOLS OF SURVEYING 226–236

UNIT - IV: MAPPING AND SENSING 237–268

17 MAPPING AND CONTOURING 239–246

18 Drawing Contours   246

19 REMOTE SENSING AND ITS APPLICATIONS 266–268

UNIT - V: DISASTER RESISTANT BUILDING 269–287

20 DISASTER RESISTANT BUILDINGS 271–281

21 DISASTER MANAGEMENT AND PLANNING 282–285

22 INDIAN STANDARD CODES 286–287

Role of Concrete Curing


Curing plays an important role on strength development and durability of concrete. Curing takes place immediately after concrete placing and finishing, and involves maintenance of desired moisture and temperature conditions, both at depth and near the surface, for extended periods of time. Properly cured concrete has an adequate amount of moisture for continued hydration and development of strength, volume stability, resistance to freezing and thawing, and abrasion and scaling resistance.

The length of adequate curing time is dependent on the following factors:

- Mixture proportions

- Specified strength

- Size and shape of concrete member

- Ambient weather conditions

- Future exposure conditions

Slabs on ground (e.g. pavements, sidewalks, parking lots, driveways, floors, canal linings) and structural concrete (e.g. bridge decks, piers, columns, beams, slabs, small footings, cast-in-place walls, retaining walls) require a minimum curing period of seven days for ambient temperatures above 40 degrees Fahrenheit.

American Concrete Institute (ACI) Committee 301 recommends a minimum curing period corresponding to concrete attaining 70 percent of the specified compressive strength. The often specified seven-day curing commonly corresponds to approximately 70 percent of the specified compressive strengths. The 70 percent strength level can be reached sooner when concrete cures at higher temperatures or when certain cement/admixture combinations are used. Similarly, longer time may be needed for different material combinations and/or lower curing temperatures. For this reason, ACI Committee 308 recommends the following minimum curing periods:


ASTM C 150 Type I cement seven days

ASTM C 150 Type II cement ten days

ASTM C 150 Type III cement three days 

ASTM C 150 Type IV or V cement 14 days

ASTM C 595, C 845, C 1157 cements variable

There are three main functions of curing:


1) Maintaining mixing water in concrete during the early hardening process

Ponding and immersion

Ponding is typically used to cure flat surfaces on smaller jobs. Care should be taken to maintain curing water temperature at not more than 20 degrees Fahrenheit cooler than the concrete to prevent cracking due to thermal stresses. Immersion is mainly used in the laboratory for curing concrete test specimens.

Spraying and fogging

Spraying and fogging are used when the ambient temperatures are well above freezing and the humidity is low. Fogging can minimize plastic shrinkage cracking until the concrete attains final set.

Saturated wet coverings

Wet coverings saturated with water should be used after concrete has hardened enough to prevent surface damage. They should be kept constantly wet.

Left in Place Forms

Left in place forms usually provide satisfactory protection against moisture loss for formed concrete surfaces. The forms are usually left in place as long as the construction schedule allows. If the forms are made of wood, they should be kept moist, especially during hot, dry weather.

2) Reducing the loss of mixing water from the surface of the concrete

Covering concrete with impervious paper or plastic sheets

Impervious paper and plastic sheets can be applied on thoroughly wetted concrete. The concrete surface should be hard enough to prevent surface damage from placement activities.

Applying membrane-forming curing compounds

Membrane-forming curing compounds are used to retard or reduce evaporation of moisture from concrete. They can be clear or translucent and white pigmented. White-pigmented compounds are recommended for hot and sunny weather conditions to reflect solar radiation. Curing compounds should be applied immediately after final finishing. Curing compound shall comply with ASTM C3094 or ASTM C13155.

3) Accelerating strength gain using heat and additional moisture

Live steam

Live steam at atmospheric pressure and high-pressure steam in autoclaves are the two methods of steam curing. Steam temperature for live steam at atmospheric pressure should be kept at about 140 degrees Fahrenheit or less until the desired concrete strength is achieved.

Heating coils

Heating coils are usually used as embedded elements near the surface of concrete elements. Their purpose is to protect concrete from freezing during cold weather concreting.

Electrical heated forms or pads

Electrical heated forms or pads are primarily used by precast concrete producers.

Concrete blankets

Concrete insulation blankets are used to cover and insulate concrete surfaces subjected to freezing temperatures during the curing period. The concrete should be hard enough to prevent surface damage when covering with concrete blankets.

Other forms of curing include internal moist curing with lightweight aggregates or absorbent polymer particles. For mass concrete elements (usually thicker than 3 feet), a thermal control plan is usually developed to help control thermal stresses. Additional information can be found in ACI Committee 308 report Guide to Curing Concrete. For specialty concretes, it is recommended to refer to other ACI reports as follows:

- Refractory concrete ACI 547.1R
- Insulating concrete ACI 523.1R
- Expansive cement concrete ACI 223
- Roller-compacted concrete ACI 207.5R
- Architectural concrete ACI 303R
- Shotcrete ACI 506.2
- Fiber-reinforced concrete ACI 544.3R
- Vertical slipform construction ACI 313

Curing in either cold or hot weather requires additional attention. In cold weather, some of the procedures include heated enclosures, evaporation reducers, curing compounds, and insulating blankets. The temperature of fresh concrete shall be above 50 degrees Fahrenheit. The curing period for cold weather concrete is longer than the standard period due to reduced rate of strength gain. Compressive strength of concrete cured and maintained at 50 degrees Fahrenheit is expected to gain strength half as quickly as concrete cured at 73 degrees Fahrenheit. In hot weather, curing and protection are critical due to rapid moisture loss from fresh concrete. The curing actually starts before concrete is placed by wetting substrate surfaces with water. Sunscreens, windscreens, fogging, and evaporation retardants can be used for hot weather concrete placements. Since concrete strength gain in hot weather is faster, curing period may be reduced. Additional information can be found in ACI 306.1, Standard Specification for Cold Weather Concreting, ACI 306R, Cold Weather Concreting, ACI 305.1, Specification for Hot Weather Concreting, and ACI 305R, Hot Weather Concreting

Curing Concrete Test Specimens

Curing of concrete test specimens is usually different from concrete placed during construction. American Society for Testing and Materials (ASTM) has developed two standards for making and curing concrete specimens. ASTM C192 is intended for laboratory samples while ASTM C31 is intended for field samples. Both documents provide standardized requirements for making, curing, protecting, and transporting concrete test specimens under field or laboratory conditions, respectively.

ASTM C192 provides procedures for evaluation of different mixtures in laboratory conditions. It is usually used in the initial stage of the project, or for research purposes.

ASTM C31 is used for acceptance testing and can also be used as a decision tool for form or shoring removal. Depending on its intended purpose, the standard defines two curing regimes: standard curing for acceptance testing and field curing for form/shoring removal. Variation in standard curing of test specimens can dramatically affect measured concrete properties. According to the National Ready Mix Concrete Association (NRMCA), strength for concrete air cured for one day followed by 27 days moist cured will be approximately 8 percent lower than for concrete moist cured for the entire period. The strength reduction is 11 percent and 18 percent for concrete specimens initially cured in air for three days and seven days, respectively. For the same air/moist curing combinations, but 100 degrees Fahrenheit air curing temperature, the 28-day strength will be approximately 11 percent, 22 percent, and 26 percent lower, respectively.


Why hook is provided in stirrups


Why hook is provided in stirrups

- To prevent from buckling of column.

- The main requirement for safety against bond failure is it provide a sufficient extension of the length of the bar beyond the point where the steel is required to develop its yield stress and this length must be at least equal to its development length. However, if the actual available length is inadequate for full development, special anchorages must be provided, such as cogs or hooks or mechanical end plates.

- Hooks are provided for to resist seismic movement.

- To prevent concrete from splitting outward.

- It prevent slippage of steel from the concrete.

- To Keep longitudinal steel bars in position and hold steel tightly.


This civil engineering article provides brief insight about why the hooks are provided in stirrups.

Hook is offered in stirrups for the subsequent purposes:

- To avert buckling of column.

- The major need for protection against bond breakdown as it offers an adequate expansion of the bar length above the point wherein/where the steel is needed to grow its yield stress as well as the length should be as a minimum up to its development length.

- Hooks are offered for to oppose seismic movement.

- To avert concrete from partitioning externally.

- It averts steel slippage from the concrete.

- To maintain longitudinal steel bars in place as well as keep steel firmly.


Excel Sheet Box Culvert Analysis and Design

A culvert is a structure that allows water to flow under a road, railroad, trail, or similar obstruction. Typically embedded so as to be surrounded by soil, a culvert may be made from a pipe, reinforced concrete or other material. A structure that carries water above land is known as an aqueduct. ‘Box culverts’ includes analyses of all relevant load cases using a stiffness matrix solution with spring supports and compilations of load combination bending moments and shears (at supports and at ’d’ from supports)

- Culvert data

- earth pressure coefficients

- loadings

- load combinations

- buoyancy and sliding checks

- analysis of roof, walls and base loading by stiffness matrix

- partial factors

- design moments

- design shears

Click here to download excel worksheet


1.Box culvert design materials 


2.Box culvert design geometry


3.Box culvert design loads


4.Box culvert design analysis


5.Box culvert design wall


6.1.Box culvert design slab


7.Box culvert design drawing 


What is Beam Deflection (Deflection Definition) ?


What is Deflection?
Deflection, in structural engineering terms, refers to the movement of a beam or node from its original position due to the forces and loads being applied to the member. Deflection, also known as displacement, can occur from external applied loads or from the weight of the structure itself, and the force of gravity in which this applies. It can occur in beams, trusses, frames and basically any other structure. To define deflection, let’s take a simple cantilevered beam deflection that has a person with weight (W) standing at the end:
In all practical engineering applications, when we use the different components, normally we have to operate them within the certain limits i.e. the constraints are placed on the performance and behavior of the components. For instance we say that the particular component is supposed to operate within this value of stress and the deflection of the component should not exceed beyond a particular value.
In some problems the maximum stress however, may not be a strict or severe condition but there may be the deflection which is the more rigid condition under operation. It is obvious therefore to study the methods by which we can predict the deflection of members under lateral loads or transverse loads, since it is this form of loading which will generally produce the greatest deflection of beams.
Assumption: The following assumptions are undertaken in order to derive a differential equation of elastic curve for the loaded beam
1. Stress is proportional to strain i.e. hooks law applies. Thus, the equation is valid only for beams that are not stressed beyond the elastic limit.
2. The curvature is always small.
3. Any deflection resulting from the shear deformation of the material or shear stresses is neglected.
It can be shown that the deflections due to shear deformations are usually small and hence can be ignored.


Because the design of beams is frequently governed by rigidity rather than strength. For example, building codes specify limits on deflections as well as stresses. Excessive deflection of a
beam not only is visually disturbing but also may cause damage to other parts of the building. For this reason, building codes limit the maximum deflection of a beam to about 1/360 th of its spans.

A number of analytical methods are available for determining the deflections of beams. Their common basis is the differential equation that relates the deflection to the bending moment. The solution of this equation is complicated because the bending moment is usually a discontinuous function, so that the equations must be integrated in a piecewise fashion.
Method of double integration The primary advantage of the double- integration method is that it produces the equation for the deflection everywhere along the beams.
􀂃 Moment-area method The moment- area method is a semigraphical procedure that utilizes the properties of the area
under the bending moment diagram. It is the quickest way to compute the deflection at a specific location if the bending moment diagram has a simple shape.
􀂃 The method of superposition, in which the applied loading is represented as a series of simple loads for which deflection formulas are available. Then the desired deflection is computed
by adding the contributions of the component loads (principle of superposition).

Back To Top